


I would like to warmly welcome you to Part III of The Switch.
First things first: The pictures of Part I & II did not show the board I bought, the board I bought myself is the MSI 870U-G55 motherboard.
Some of you would say it wouldn't have been the best choice according to the offered features, but I said I would like to give the board a try.
The board has 12 USB ports in total, 2 of them being 'USB 3' you miss SATA 3 on this motherboard, but the rest looks really solid (OC Button, Military Class Components etc).


This motherboard's outer appearance is really great and before building it inside of my PC I thought of the board as being far superior than my old AM2+ board.
So the actual switch was not really difficult: Old board out and new board in. The last step was a bit irritating to me, because the board is a bit shorter than the A770 Crossfire. So instead of having 10 screw holes which hold the board, MSI shortened the motherboard and thought that 6 must be enough to have the board hold stable inside a PC case. That was the first thing which made me question if the board was a good choice. Well after having everything build in and all 4 memory sticks installed I plugged in the power and pressed the power button to turn on the PC. The first thing I did was to go into BIOS to check if everything was going right. Then I booted up Windows 7 which took me like 5 minutes before I could enter the password of my account (Note that I got 2 accounts, one for me and one for reviews). The reason for the long time was, that Windows needed to install all my USB hardware and using a USB keyboard wasn't real clever for the first boot of the old Windows on "new" hardware. After having the rest of the drivers installed Windows was performing like with the old motherboard, so there wasn't a real difference, except that it was 4 times the memory to waste.
So now I got enough time to check out the boards features, but the first thing I did was to open CPU-Z to check if everything was really OK. But it was not: The CPU's frequency was running at 247x14 which gave me a frequency on all cores of 3.45 GHz. I wondered where that boost came from and the answer was quite simple: The Overclocking button was accidently enabled. Knowing that the Phenom II X6 of mine has unlocked BIOS multiplier of 16.5 I entered the BIOS and raised the multiplier to 16,5. But instead of having 247x16.5, the board made it 227x16.5 so that in the end the processors runs at 3.7 GHz on all 6 cores. Of course I disabled TurboCore and Cool'n'Quiet and the other things to have a maximum of system stability. My next try was to test if the debug tab of the program K10Stat still allows me to edit the CPU's register to raise the processors multiplier above 16.5 and after the disappointment of the slimmer sized board I got disappointed again: No more multiplier raising above the 16.5, whether the OC-Button is enabled or disabled, it didnt matter. It is not the first time for me that this debug tool does not work: On a friends board with a 1090T the tab does not work too, so I guess there is something inside the BIOS of the old A770 Crossfire that enables editing of CPU registers. Or second thought is that there is some option inside the MSI BIOS that protects the register.


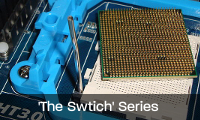
Hope you like the pictures of the board (click on them to enlarge), an explanation will be found in our upcoming video once our new YouTube channel has been set up.
And thats all for Part III of The Switch.
Written by:
Andreas Gunkel
Also See:
Part I
Part II
Part IV
No comments:
Post a Comment